Weaponlight upgrade

I try not to be a dinosaur, but sometimes it just happens. Case in point: weaponlights.

This is the G19 I keep on the nightstand:

It’s been sitting by the bed for…mmmm…the last15 years, at least. It wears some night sights that, really, I should be replacing and it also has a Streamlight M3. This is a weaponlight that, in todays world of high-tech, would not even rise to the level of airsoft. At the time I got it, which was probably 20 years ago, it was decent. But, time and tech march on. I was at a gun show today and thought perhaps it was time to up my game.

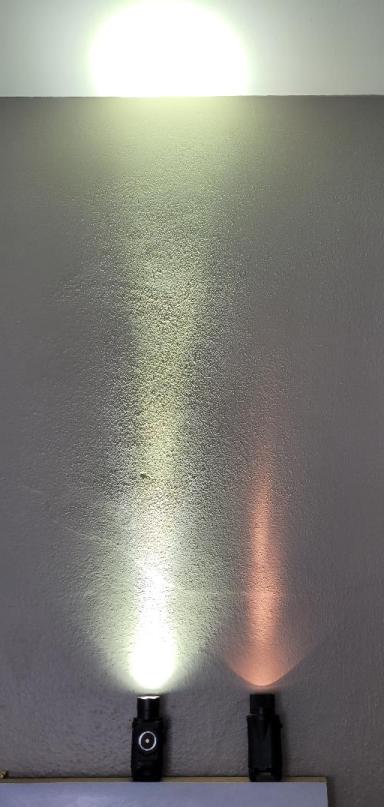
This is an Olight Valkyrie PL-Pro that I picked up at the gun show. It surpasses my ancient M3 in so many ways that the only real way to express it is through a picture:

And that is not with weak or dying CR-123’s in that M3. The simple truth is that battery and LED technology have advanced so far since I purchased the M3 that, compared to what is available now, the M3 doesn’t even clock in as ‘toy quality’.

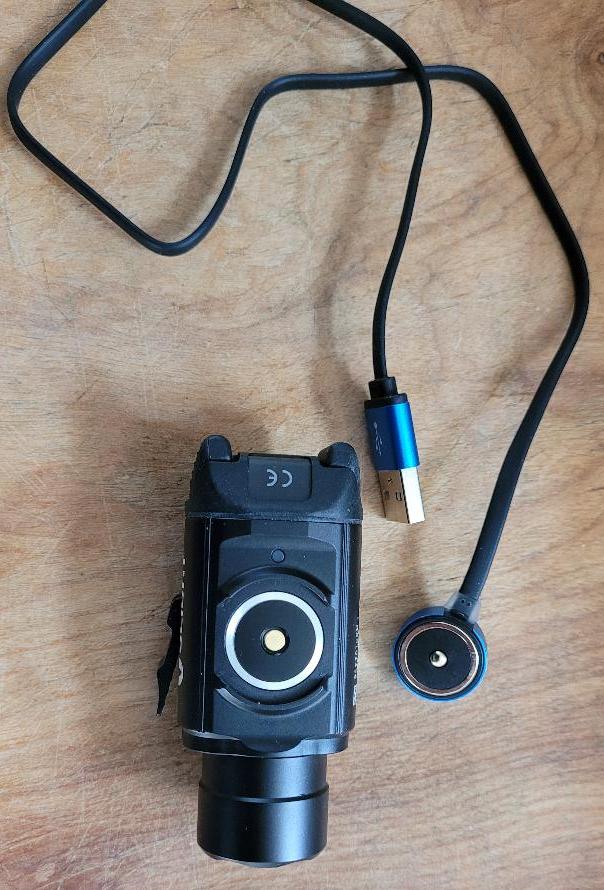
And speaking of technology, the M3 has one function: on/off. This Olight has a high, low, strobe, temporary on, constant on, and a lockout function. Even more interestingly, it is chargeable through USB.

And…the unit has a low charge warning indicator, and a charging/full indicator on the charger. And that charger, by the way, attached magentically…which is kinda neat.

And since its LED you get brighter light, longer battery life, and less fragility than with the older incandescent bulbs. Man, how technology has changed.

So…upgrade time for the trusty bedroom Glock. So far it seems like a fine product and I might get another one or two fr some of my other pistols. After all, its dark 50% of the time. Oh…and I need to swap out those faded tritiums as well.

‘Tis the season for holiday upgrades!

Evolving from Fenix 12 to 12 v2.0

So the term “EDC”, as you know, has become the handy prepper acronym for ‘Everyday Carry”. It’s also used as a noun in interrogatives, such as “Hey man, show us your EDC” which is an invitation for every swingin’ johnson to dump his pockets on the bunk and display magazines, ammo, knives, watches, multitools, pens, flux capicators, or whatever they think they need to have on them at every moment of every day.

Theres only a handful of things that I keep in my pockets – wallet, flashlight, pocketknife. And, surprisingly, the flashlight gets quite a bit of use. So, imagine my annoyance when I discovered that I somehow lost my Fenix E11. Not a big problem since they now make the E12 which is virtually identical. Put when I went to Amazon to replace the E12 I pulled out of storage, I discovered that the E12 is also now history. Instead it has been replaced with the E12 V2.0. So..I hit the buy button.

Here’s the skinny on the E11 and E12 line of little AA-batt flashlights. For the money, I like these a lot. I’d like a SureFire even more but given that I just lost my last E11 I’m reluctant to spend $200 on a flashlight that has a higher than 50% probablity of winding up lost and rolling around  on the floor at CostCo.

I got the new E12 V2.0 yesterday and it is as handy as my older ones, but has some differences. It is slightly narrower in diameter than the older ones, although the emitter section is of the same diameter. It is also noticeably shorter, which Im not sure I like. The shorter length makes it hard to hold in your fist and operate with the thumb. But, the more compact design is welcomed by my pockets. Biggest difference is that the tailcap switch has three modes…low, med, high..which means if you want a small task light for reading menu’s in a restaurant of finding your dropped wallet in a darkened theater you can do so without lighting up the area like a movie set. Also, theres a very welcome and remarkably clever belt clip that allows you to orient the light up or down when you carry it.

Price is about the same..$27~ so no real change there. My experience has been that these are excellent little flashlights for everyday pocket carry. Pretty unobtrusive, puts out a good amount of light, pretty bombproof, run on easily acquired AA batts, and have features that make them more useful than 3-for-$5 pocket lights you find at Horror Fraught..I mean, Harbor Freight.

YMMV, of course, but if you’re looking for a solid performing little pocket life that can withstand alot of abuse and won’t break thebank, this might be worth looking at for you.

Thai one on

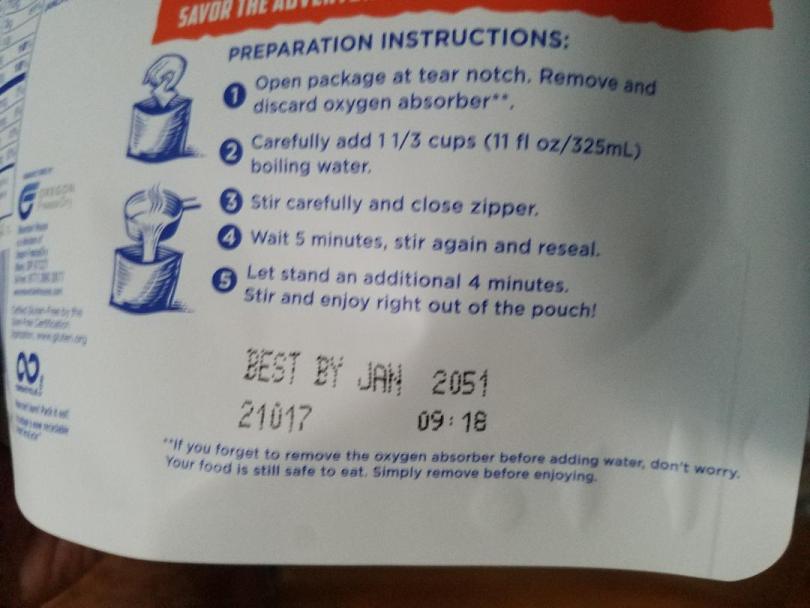
So, the Mountain House order arrived the other day. The cans have always had a long shelf life but apparently that now extends to the pouches as well. Behold:

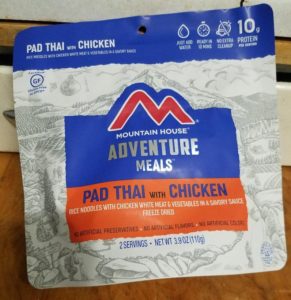
I will actually be dead before the food hits its Best By date. On the one had, that’s a little creepy…on the other hand, as a survivalist, it kinda gives me a warm fuzzy. Although I ordered a buncha cans  (102 of them, to be exact) I did also wanna try some of the new flavors in the pouches. And…..Chicken Pad Thai sounded kinda good.

It says two servings but…lets be grown ups….you’re gonna eat the whole thing.

In its dessicated state:

Kinda looks like breakfast cereal waiting for milk, doesn’t it?

And after 1-and-1/3 cups of boiling water, and ten minutes sealed up in its pouch:

Yup..had to wait ten minutes. Ten minutes! Say it with me:

And the verdict? Good! Although it was not nearly as spicy as I had hoped. If you can get a tiny bottle of Siracha chili paste to go in your meal kit (as opposed to the mini Tabasco) it would not be a mistake. I understand that when it comes to food like this you need to appeal to the broadest common palate…and that means underspicy is better than overspicy. But…coulda been a little hotter. Still, though….I ate it all and liked it alot. So much so, in fact, that I might have to order a couple more cases. MH has a habit of discontinuing the flavors I really like. (For example, I really, really miss the Shrimp Creole.)

So, when its been a long day of post-apocalyptic scavenging and senseless violence, and the desperate-yet-morally-challenged coeds have been rescued from the Aryan blood gangs, it’ll be nice to relax around the campfire of burning “Biden 2020” placards and enjoy some fine pseudo-Thai food.

America Stone knife sharpener

Several weeks back I got an email from a fella asking me if I’d be interested in trying out a sharpening tool he was promoting. I love free stuff, so, ‘Sure!’.

Thus far, my hands down favorite knife sharpener has been from these guys. The one that I highly recommend has been this one. And while it’s been awesome for sharpening my pointy stuff, it doesn’t quite fit in the pouch on my knife sheath.

So, I received this stone and pouch in the mail the other week. It’s a pretty unassuming stone…a ceramic-ish looking stone that is rounded on one edge and beveled to a point on the other. Here’s the website, and there is a video on YouTube to explain it’s use:


Yes, its a pretty DIY video but production values don’t really have much to do with whether information is  accurate or useful. It would have been nice to have some good close ups, but you get the gist if you watch it all the way through.

Anyway, I watched the video and decided I’d try it out on one of my hard-used knives…specifically my Glock knife that I use for hunting. Here’s what it looks like these days:

It had a small nick in the edge about 3/4 of the way down the blade and the video said that using the wedge/pointed shape of the stone would take care of that so….off we went. Three strokes each side using medium force, and repeated this a dozen or so times. Then, as the video says, I used the rounded side to sharpen things up. And…it worked. How sharp? Well, there’s always the ‘will it cut paper’ or ‘will it shave the hairs on your arm’ sort of tests which are kinda unquantifiable. Like everyone else, I test the edge with my thumb and pull the blade across my thumbnail. If the edge bites into the thumbnail , I know its really sharp and will cut. My unofficial test is to slice up some cardboard boxes…I try doing that, gauge the effort required, then sharpen and try cutting again. The subjective difference in effort required tells me what I want.

I did find that this stone did not work as effectively on thin, flexible blades. I suspect this is because as you move down the length of the blade, the force you exert cause the blade to bend away from you..throwing off the whole process. So, for a long thin-bladed slicing or fillet knife it might require you to do something to hold the blade in a rigid, unflexing manner. For my Glock knife, which has absolutely zero flex in it, not a problem. For pretty much any knife that isn’t a fillet knife, there shouldn’t be any issues.

Did an outstanding job on my Glock knife, and, interestingly, a prety admirable performance on my good kitchen Henckel knives.

What I’m most interested in is whether the stone would fit in the knife sheath I like to use. (The SpecOps sheath) As it turns out, the stone is about the size of a couple sticks of chewing gum…so not only does it fit in the pouch, you could actually fit more than one in there. So if you have a knife like the USAF ‘survival knife’ or a Randall with those pouches on the sheath, this thing should fit in it just fine.

So, what’s the final word? It seemed to do what was promised and it did something the Worksharp did not do, which is fit into the pouch on the sheath. I think, for me, the greatest use for this is for an in-the-field sharpener. Gut your elk, break a few joints, touch it up on the stone, cut some more, break it up some more, touch it up on the stone…that sort of thing. It also did a really nice job taking a nick out of the blade, which kinda surprised me

Durability? Can’t say. I did drop it once on my kitchen floor and it didnt break or shatte, but that’s strictly anecdotal. However, it’s small size and mass means that it probably would survive being dropped more than a larger, heavier stone would. .

I’d like to get a couple more of these for my other knives and kits. I can see where I might, when at the house, do my sharpening on something larger like a Lansky sharpener system or a series of Smith stones, but as a field sharpener this thing has some nice merit – it works, seems to not require much attention to angles, and fits in a tiny space – all big pluses when you don’t want to carry more weight than you have too.


Watergun: The triumphant return of the Watergun

Ok, for those of you who missed the backstory, you can do a quick trip down memory lane. 

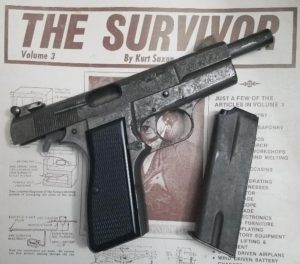
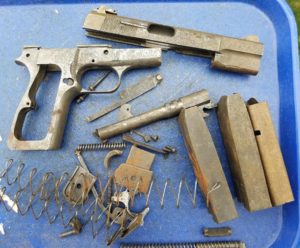
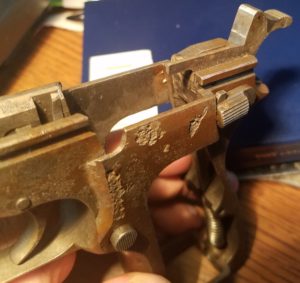
The short version is this: a P35 from the bottom of Lake Michigan came into my hands. It was a shoebox full of parts, and although there was severe pitting everything seemed functional. I replaced three or four small parts and, surprise, the thing ran just fine. Only trouble was, the finish, such as it was, looked ‘like a topographical map of Utah’. At the gun show a couple weeks ago I met some folks who were local, had some very impressive samples of their coating work, and seemed to have some very good prices. So…why not? To recap:

And, as you’ve been waiting for:

And for full effect:

Work was done by these guys:

Now, let’s address an elephant in the room…yes, you can still see the deep pitting under the coating. Well duh. I didnt expect the coating to fill in potholes like those. Much like how there isn’t enough Bondo and tequila to make Hilllary Clinton look like Jennifer Lawrence, it would take a 50# bag of ceramic mix (or whatever they use) to smooth out this P35. But I wasn’t after ‘make it look like new’..I was after ‘make it look nice and protect the bare metal’. And…seems legit. Price? Well, the gave me a nice discount which I very much appreciated. You can see their prices on the website. I’ve no complaints.

I’ll be sending a couple guns out for coating, I think. Most notably an AR and PTR to get bit of Danish M84 on ’em.

So there you have it, gang. The Watergun is now pretty much done. Since it is in no way a ‘safe queen’ candidate, it is pretty much a ‘truck gun’ in terms of being babied. Can’t really ruin any value on it since my basis is darn near zero and any collector value sailed about the same time the gun did.No, this might just get tucked into my Avenger holster and start carrying the P35 again.


Monovaults…a do over

I was puttering around in the basement moving some stuff around and one of the things stacked in the corner with the ‘this pile is for the secondary location’ is a couple of Monovaults.

I had done a lengthy post on the Monovault back in 2013 but when the website crashed I lost about a years worth of posts and that was one of them. A shame too, because it was actually a pretty informative post about what I thought was a very good product. So much so, in fact, that I’m going to go through the tremendous pain in the butt of retaking the pictures and reposting about it.

Succinctly, the Monovault is a large diameter plastic tube designed for storing (and burying) whatever items you feel need to be tucked away somewhere. The tubes have a Gamma Seal lid closure at one end, and then a ‘burial cap’ that goes over that to make retrieval easier. The tubes come in several different lengths and diameters depending on what it is that you want to tuck away.

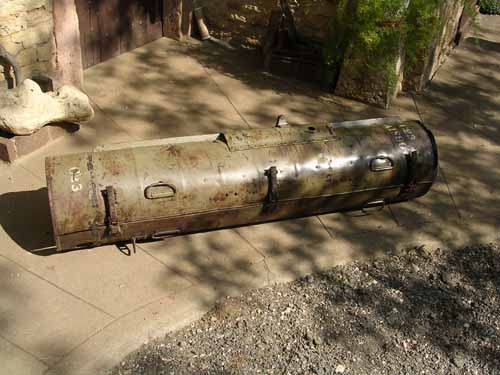
Remember those cylindrical weapons/supply containers from WW2 that we’d see in movies? It’s pretty much a very modernized version of that.

WW2-era airborne supply drop tube. These things still turn up once in a while when someone treks out into the dense forests and swamps over in Europe.

Purpose? Nominally, they are sold as burial vaults for whatever it is that you feel needs to be buried. And, that makes sense. But I’m a bit of an outside-the-box kind of guy and while I’m sure these would work just fine for burial, to me they are more of an ideal cache container. While burying is certainly an option, the qualities that make a container suitable for burying (waterproof, airtight, durable,etc.) also make them perfect for enplacing in above-ground environments – hidden in attics, under porches, buried in brush piles, sitting in the corner of the basement, under the gravel pile on the back forty, etc.

I wound up with two versions of the Monovault which were supplied to me by the fine folks there. (We actually did a bit of trading back and forth.) Being me, I wanted the biggest one they had (the #248)  and a midling sized one – the #130.

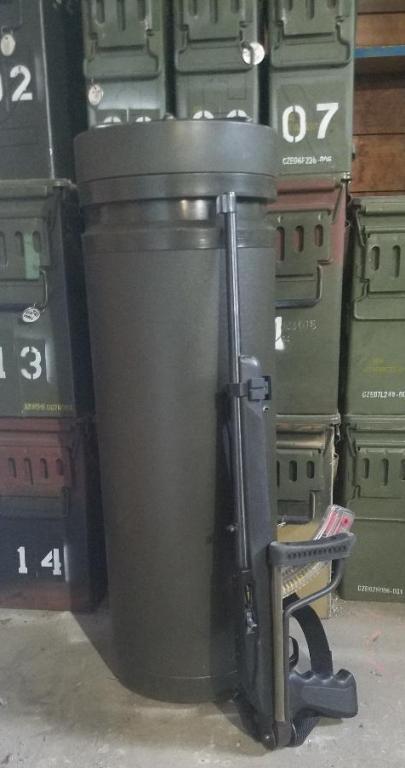
The #130. Fits a folding 10/22, a daypack, boots, water, food, radio, flashlight, batteries, and a few other things that might make a big difference to you when you discover that your world has suddenly taken a turn for the sideways.

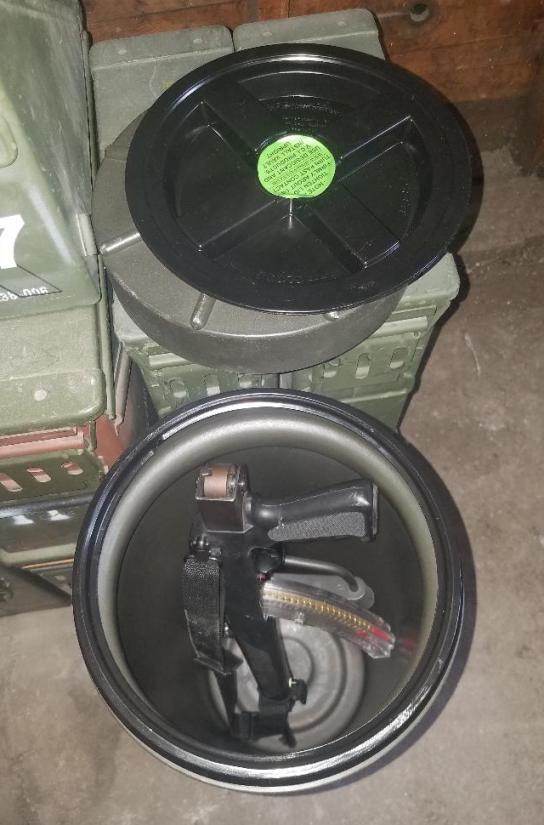
Gamma Seal lid and ‘burial lid’ cover. Still enough room in there to pack the essentials that would give you several orders of advantage over the rest of the herd. Pack wisely.

The #130 seems like the perfect size for the “I want to keep some essentials around in case I have to leave in a hurry”. A folding (or takedown) 10/22 will fit in there [as will the new takedown Ruger 9mm carbine] along with a frameless medium ALICE pack (or your favorite daypack), along with room for comfortable shoes, a jacket, radio, pistol, water, and a few other goodies. If you were stuck in an office building on 9/11 and had to walk your way out of Manhattan, one of these would have held pretty much just what you needed – water, shoes, radio, flashlight, weapon of choice, and that sort of thing.

The #248 is where the real action comes into play. Large enough that hauling one full of gear to a burial or cache sight might be a two-man job, it’ll hold everything you need to get your immediate life back on the rails. A full size rifle like a 20″ AR or HK .308 will fit inside with no dificulty. If you pack a smaller or broken down rifle in there, theres room for a backpack, military sleep system, freeze drieds, and a bunch of other gear. My checklist for packing for this sort of thing is ‘it’s the middle of winter, dead of night, and I’m dropped naked in the middle of nowhere. What do I need right now?’. However, if you want to have a bundle of gear dedicated to a particular purpose….exclusively gunstuff, exclusively food and water, exclusively gear, etc, these things would be good choices for that.

Big enough to handle the larger rifles. When you’re done filling this thing up, it’ll be heavy so plan accordingly.

Although I use a large Pelican case for storing my winter vehicle gear, one of these would make an excellent container for that task. Especially since you could just leave it in the bed of your truck (secured, of course) and it’d be impervious to snow and wet. Also, it’s long cylindrical nature lets it take up less room.

For storing guns I prefer the Pelican rifle cases. They’re very good at that job and, as you might expect, theyre also fairly expensive. Problem is, unless you get into the really specialty Pelican cases (which are even spendier) you can’t really stuff a goodly amount of gear in a Pelican case along with your rifle. The Monovault lets you do exactly that. In fact, if I were storing some gear hidden away at the Beta Site I’d probably tuck the guns in Pelican cases and the gear in the Monovault. (Although, if I wanted an all-in-one solution it would all, gear and rifle, go in the Monovault.)

Pricing is about comparable to what you’d pay for a Pelican case, so it’s not too outrageous. Like a Pelican case, the annoying part is paying the shipping for a large bulky item.But…when it’s 2am, the snow is coming down, and you finally bring your exhausted vehicle to a stop at your bugout location what’s it worth to know that your food, guns, radios, camp stove, and winter gear are all dry and clean tucked away under the floorboards waiting for you?

TechSights install

The TechSights I ordered arrived today and, naturally, that means I spent some time getting them mounted on one of the recently acquired Mini-14s.

From a functionality standpoint they seem superior to the Ruger factory sights…the adjustments aren’t as coarse. Only drawback seem to be that the aperature is a tad smaller than what was on the factory sight. This would contribute to accuracy (or what passes for accuracy in a Mini-14) but it would slow down your fast target acquisition. Fortunately, other aperatures are available and I’ll be getting a slightly larger one.

Having used the Tech Sights on the 10/22 rifle, I’m pretty confident these will work out just as well. Obviously I still need to head out to the range and re-sight things, but so far I like what I see.

If you get a set of these, a couple caveats:

  • There are some really small parts. Work over a flat, smooth surface or some other environment that will make finding dropped parts easier
  • It looks intimidating, but following the instructions shows that it isn’t nearly as complex as it looks. Probably took me fifteen minutes and about half of that was looking for a punch and a few other niceties.
  • Trickiest part was putting on a tiny e-clip onto the end of a screw. That’s the part that, if it goes flying, you’re never going to find…so keep a handle on it.

Choate Mini-14 stock

As you may recall, I picked up a Mini-14GB last month. Fine gun, nothing wrong with it. (The magazine was a different issue.) But…that wooden stock…..

An email to the fine like-minded individuals at Choate for a replacement stock revealed that not only did they have the stock I wanted, it was available in something other than the ubiquitous black – a nice shade of green. Yes please! Arrived today. Thus:For my anticipated needs, I really like rifle furniture that is something other than black. Black just jumps out at you since large pitch black objects are not something you normally see everyday and when you do, well, isn’t your attention drawn to them? This is the reason I went with the green laminate on my Scout rifle and the green laminate on my .22….. I think they blend in with my environment much better than black.

Why get rid of the wood stock? Well, Im not getting rid of it as such…I’ll keep it for some tinkering projects, but if the time comes when leaving the house every morning includes throwing a rifle into the back of the vehicle or slinging it into a scabbard on a motorcycle, getting rained on, dropped, banged around, and generally abused….well, the Choate products are, literally, pretty tough to beat.

The stock itself is deliciously rugged, it took all of a couple minutes to transfer the hardware from the wooden stock to the Choate stock, nothing needed fitting, and although I havent checked it yet, I think it might be a tad lighter.

When I buy gear for the sake of increasing my odds of survival and comfort in the uncertain future, one of the rubrics is durability and survivability – in short, I need things that can withstand abuse or neglect and still perform all or some their function. This is why I’m a huge fan of the Choate replacement stocks for my shotguns. A Mossberg 500 that was buried in mud after Katrina will probably be rusted and need a couple parts replaced, but you could hose off that Choate forend and stock and you’d never know they spent a month under a mountain of wet sewage and sludge. Thats the sort of property that I want my gear to have… I try to take care of my gear, I try not to abuse it, but if the time comes where I have to neglect it and let the chips fall where they may..well..it’s nice to know they’ll hold up juuuuuuuust fine.

Other than a couple factory mags, this concludes my financial expenditures into this gun. I have enough ARs and PTR’s that it would be a strange circumstance indeed that this gun becomes my go-to carbine. But…it is an uncertain world, after all.

Ruger Mini-14 magazine followup

So I had a fairly lousy experience with the aftermarket magazine that came with the Mini-14GB I picked up a few weeks ago. I really shouldnt have been too surprised since the prevailing wisdom is that, currently, there are NO acceptable aftermarket mags. Now, as much as that was a bad experience at the range, paying $30 (dealer cost, mind you) for a factory magazine is an even uglier experience.

Now, an important distinction really needs to be made here. I almost always prefer factory mags (or .gov contract mags) to aftermarket mags for my guns. BUT…for a non-critical gun, or what we can basically call a ‘range toy’, I don’t mind aftermarket magazines. (I mind junk aftermarket mags, but a good aftermarket mag is acceptable.) So, since this Mini-14 isn’t really on my radar for an End Of The World sort of thing, I don’t mind using aftermarket mags if they are good aftermarket mags.

(However, in the name of transparency, I will say that I am going to pick up four factory mags ‘just in case’.)

Anyway…

Over on YouTube there’s a gear/guns channel I watch from time to time that does the sorts of gear evaluations I like – they buy the gear, they test the gear, they beat the gear, the review the gear. They had a video up on the Tapco aftermarket mags and they got great reviews. Ok, let’s get a few and see what they’re offering………

  • Overall Impression
  • Metal reinforcement and lockup
  • Basepad and follower
  • Legacy gear compatability
  • Pricing

Overall Impression

Tapco has been (and somewhat still is) the source of many memes and disdain in the gun community. Their name has even been made into a verb – “Bubba got that SKS and he Tapco’d the hell out of it. Look at all that crap!” But, apparently, they are making a pretty slick Mini-14 magazine.
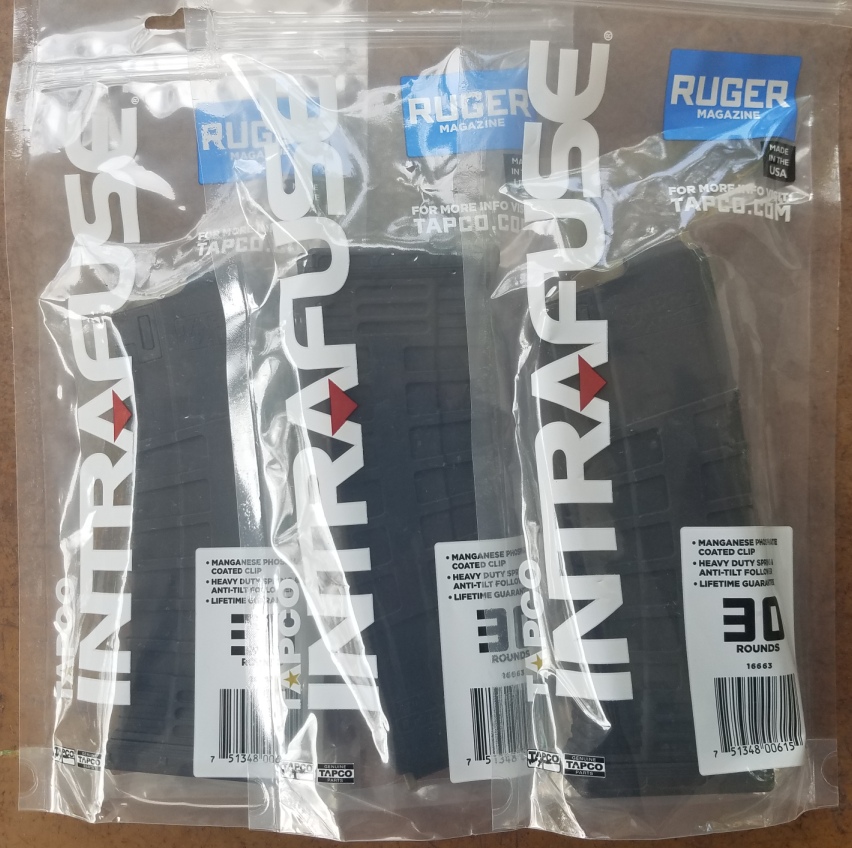
The Tapco Mini-14 magazine resembles a Magpul PMAG in many ways. The follower is very reminiscent of the Magpul, and the overall ‘feel’ of the polymer/plastic is also very similar.

Metal reinforcement and lockup

These mags are the second generation of Mini-14 mags from Tapco, the first generation did not have a metal reinforcing tab where the engagement/lockup of mag-to-gun took place. As a result, wear and deformation could occur that would cause magazines to seat improperly which, naturally, leads to reliability issues. Case in point: look at this aftermarket metal magazine which it appears could have stood a little heat treating. The post-in-hole lockup area is pushed inward from repeated magazine insertions. As the metal pressed inwards, it made seating the magazine securely more difficult which exacerbated the problem by trying to ‘force’ the mag to seat…which just pushed the metal further inwards.
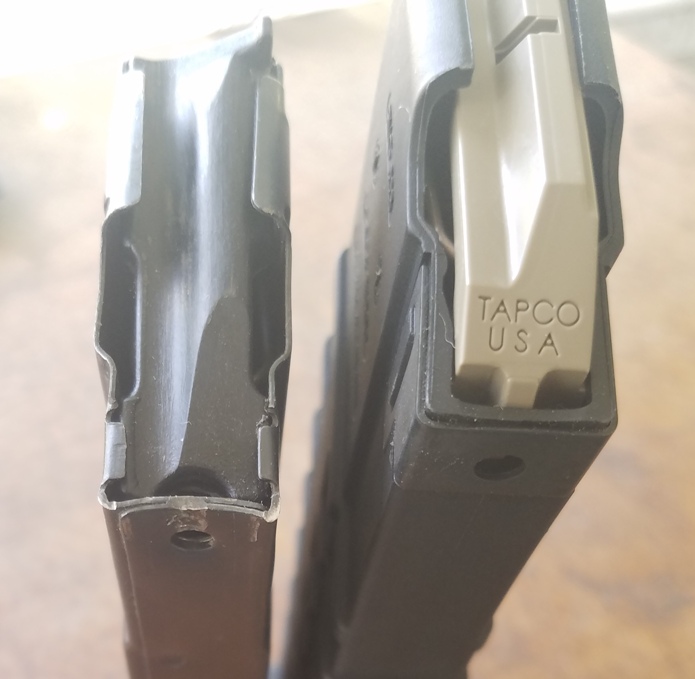
The Tapco magazine has a steel clip surrounding the front of the magazine to take the wear and resist this sort of issue. Lockup in my particular Mini-14 was good. There was some play, as is to be expected, but it was ‘play’ not ‘slop’. More importantly, there were no reliability issues with feeding. (This can be seen on AK mags, which use a somewhat similar method of magazine retention…there’s usually some play, but nothing that affects function.)
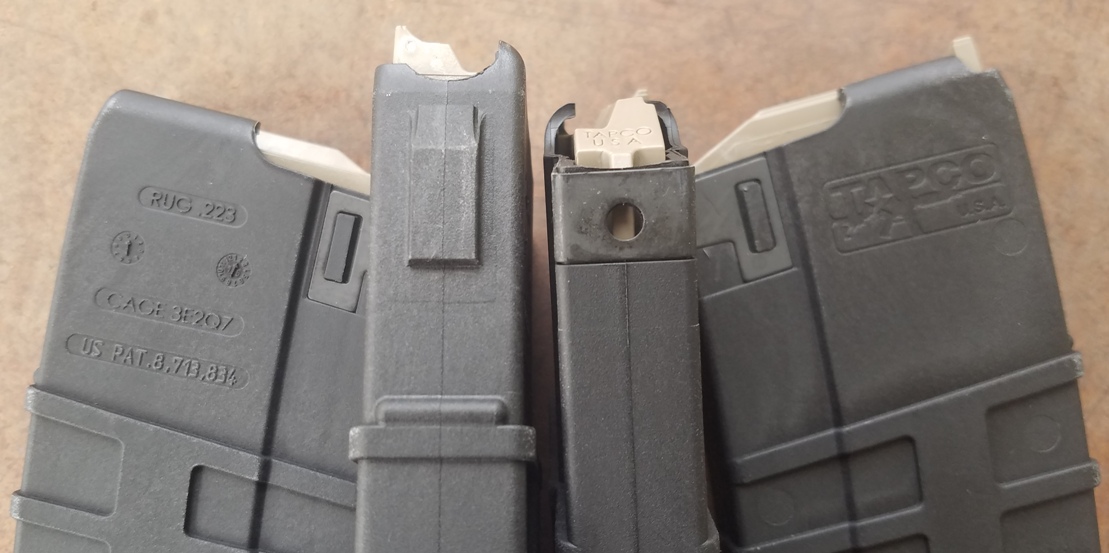
Basepad and follower

The magazine basepad and follower are going to seem familiar to anyone with a bunch of Magpul PMAGs. The followers are very non-tilt and they move smoothly up/down within the magazine body. The basepad is a bit chunky, but has a very easy to manipulate locking mechanism making magazine disassembly a breeze…much easier, IMHO, than GI AR mags.
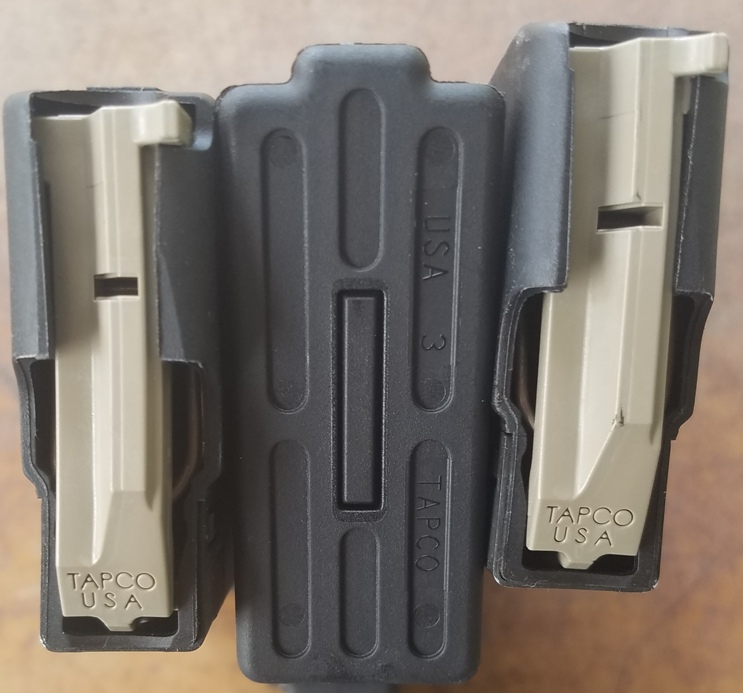
Legacy gear compatability

A big problem with polymer mags is that, dimensionally, they do not have the same ‘footprint’ as their metal counterparts. For example, a metal Mini-14 mag and the Tapco both hold 30-rounds but the Tapco is longer and a bit wider. This can cause problems in terms of fit in pouches that were designed, ostensibly, for AR mags. ‘Legacy’ gear..those AR pouches you’ve collected over twenty years…may not be the best fit for the bulkier Tapco mag. Modern pouches, though, often have adjustable flaps on them and those help tremendously.
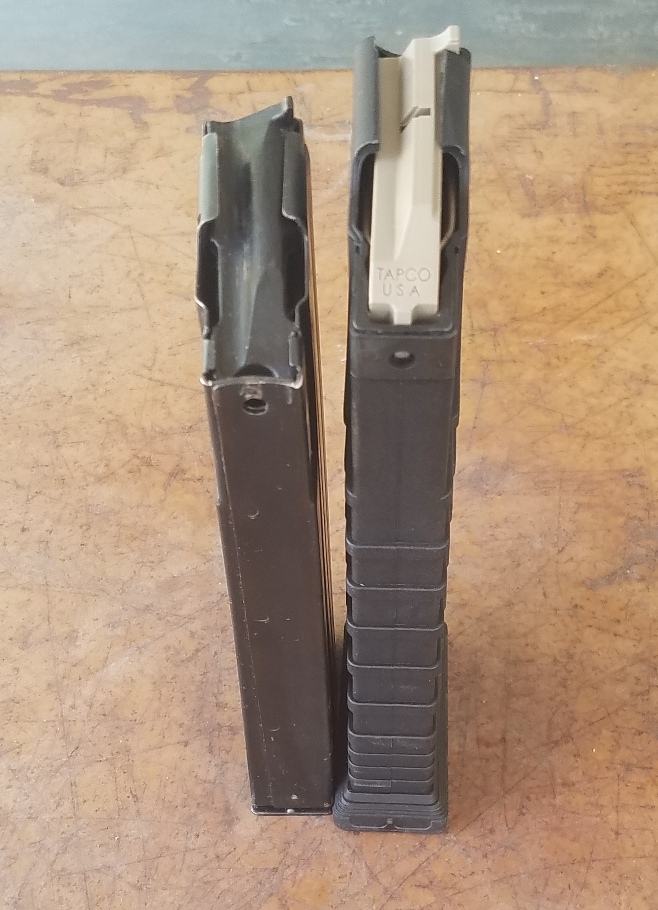
I found that the mags did fit in open-top pouches, although they were a tiny bit snug. In magazine pouches that utilize a flap closure, they did not fit unless the flap was adjustable.
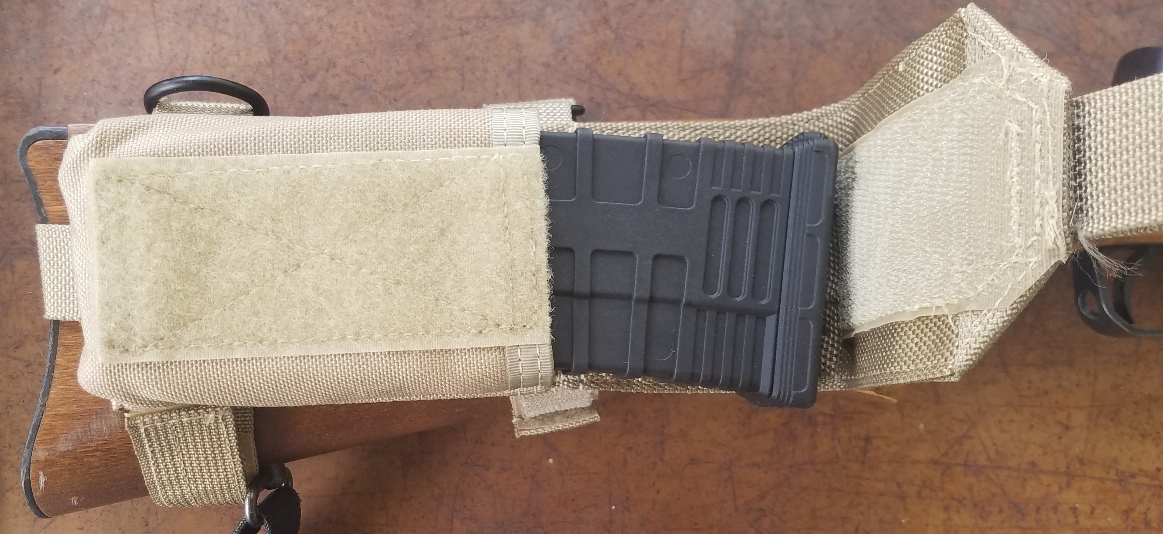
AR mag pouch with a non-adjustable closure flap. Tapco mag is too long to allow flap to close. Fortunately, most mag pouches with flap closures these days are adjustable.
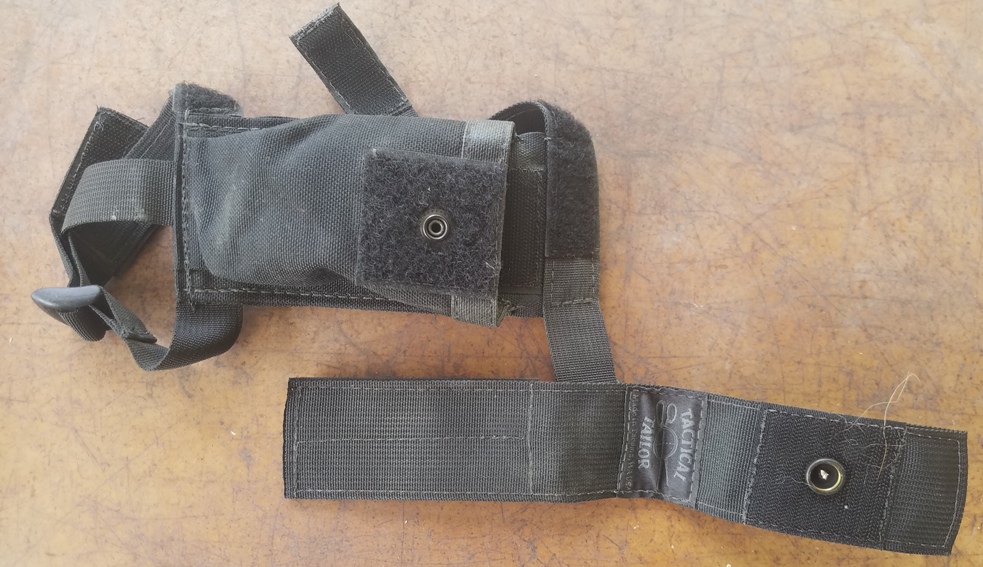
Tactical Tailor stock-mounted mag pouch for AR mags. Note that it has a velcro adjustable closure flap.
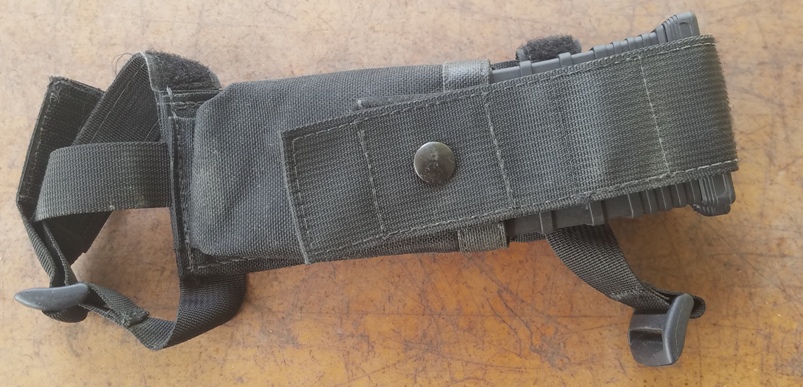
This mag pouch can do double-duty …. AR or Mini-14 mag. Or, really, any other similar magazine since the adjustable flap closure provides the ability to accommodate other mags.
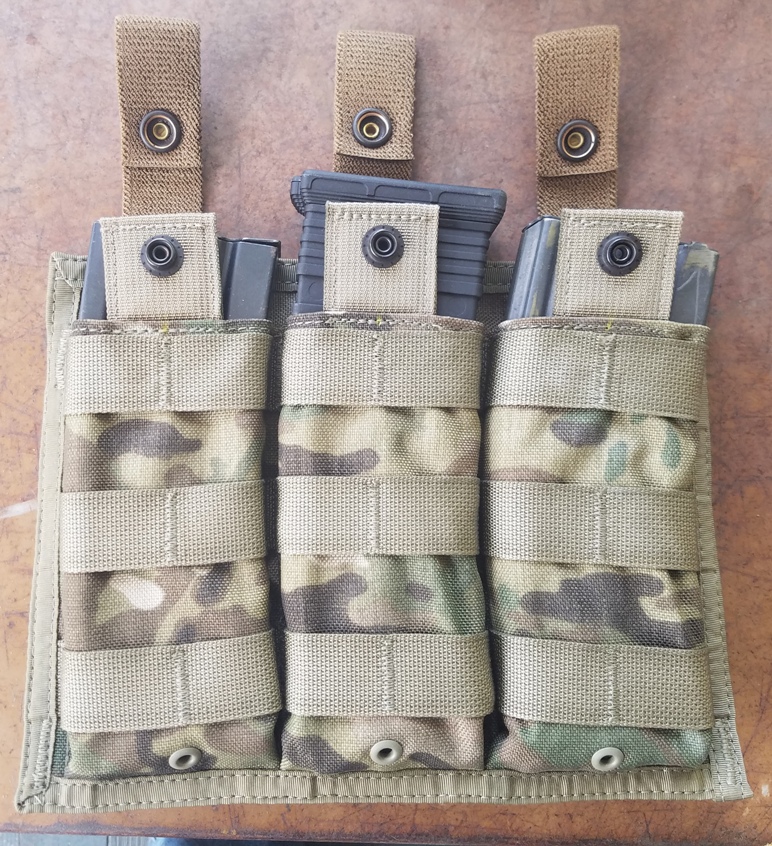
Single-mag pouches like this one work fine except the retention straps, though elastic, are a bit too short to accommodate the longer Tapco mag. Left: Metal Mini mag, Center: Tapco mag, Right: GI AR mag. SpecOps magazine pouch.
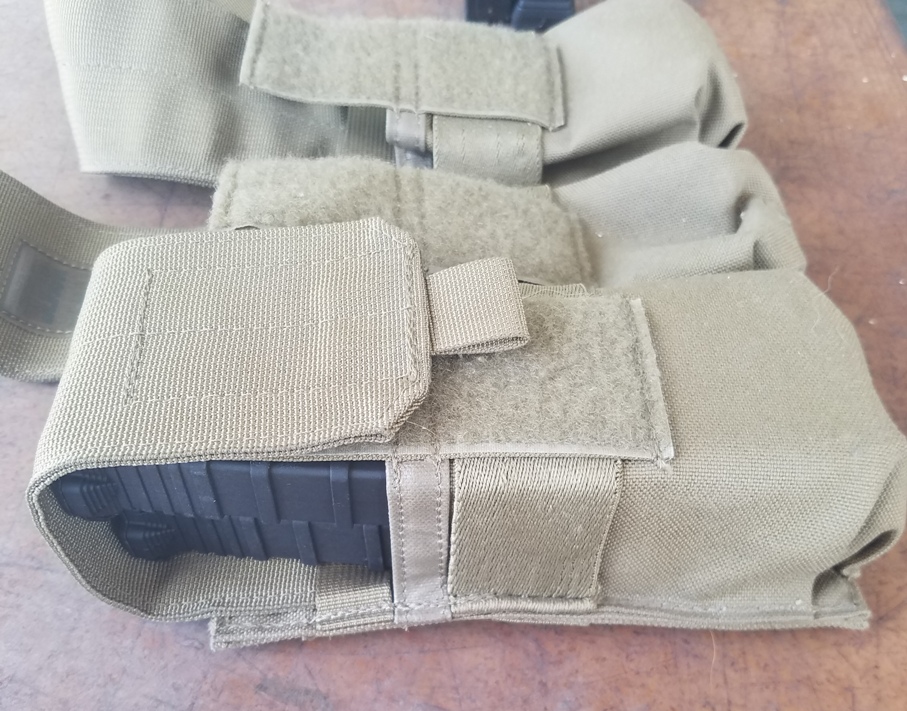
Double-mag pouch with velcro adjustable flaps holds two Tapco mags with no problem. Heavy ribbing on mags makes withdrawing one mag a little tricky. Pouch: Blackhawk

A possible issue (or non-issue) I noticed is that the Tapco mags have aggressive ribbing on the magazine bodies. You will get a sure grip on the magazine. However, stack two mags together in a pouch and one mag will get a sure grip on the other. If it’s a snug fit for two mags in your mag pouch, expect some ‘rim lock’ as you try to pull one mag out. Again, a single-mag pouch should be fine.

No stripper clip guides on the Tapco mag. Not sure if that’s important to you or not, but sometimes it’s a ‘nice to have’.

So, how’d they shoot? Shot fine. Put about a hundred rounds through them and didn’t have a hiccup. Mags fed fine, locked open on last round, seated and extracted just fine. Certainly a better performance than I got from the no-name aftermarket mag and about the same performance I would expect from a Ruger factory mag.

Pricing

Pricing? Well, retail is for suckers so I usually pay dealer prices. Dealer on these was around $12, so I would expect to see them in the wild around $19.99. For comparison, a Ruger factory mag is, dealer, $29.85. And that’s dealer price.

As I said, this isn’t a run-out-the-door rifle for me, so I’m okay with quality aftermarket mags. But…I wouldn’t feel terribly disadvantaged with these Tapco mags if I got dropped into Katrinaville with a Mini-14 and a dozen of these.

Historically, it has been a bigfoot-hunt to try and find an aftermarket mag for the Mini-14 that was reliable. The only aftermarket mag I ever found that worked perfectly in the Mini-14 platform was the old Eagle 35-rd mags and they haven’t made those since the ’90s. These Tapcos seem to have cleared the bar on a good aftermarket mag finally coming to market. Your mileage may vary, of course, but I ordered a dozen more for myself and think it was a very good purchase.

Its only overkill if you don’t need it

So after the last large purchase of freeze-drieds, it was time to put the leftovers away. The freeze-drieds (FD) are packaged with an advertised shelf life of a minimum of around 30 years, and the experience of some folks seems to suggest that rating is pretty spot-on.

Thirty years…. I’ll expire before the food does.

But, the food only lasts as long as the container it’s packaged in. Now, I have had some MH sitting on the shelf for almost 20 years and it appears to be just fine. BUT….I have also had some #10 cans from the LDS cannery that eventually started to rust and look like they may be a bit sketchy. (One can had almost turned black with freckling, but when I cut it open everything was flawless inside…but there is no room for ‘probably ok’ when it comes to food storage.) Honestly, I do virtually nothing special to my #10 cans…I stick ’em in a cardboard box that holds six cans, tape it shut, and stick it on a wire shelf in my basement. Here in my part of Montana, the basement stays cool with virtually no humidity…optimal conditions. But, when a can of FD beef or chicken sets you back fifty bucks a can, it’s probably a good idea to maybe add an extra layer of protection. And some folks live in areas where the humidity can get downright troublesome…like, oh, the southeast US for example.

I’ve read a lot of stuff on how to store food long-term. Other than the ubiquitous statement about ‘a cool, dry place’, there are a few other suggestions on how to make sure your canned stuff doesn’t have it’s structural integrity compromised. The most detailed that I’ve read involves removing the labels from each can and ‘painting’ the can with (or dipping it in) melted paraffin. This seems like a pretty solid way to do things except that it also sounds like a tremendous pain in the butt. As I pointed out, there is an alternative. The folks at repackbox.com were kind enough to send me one of their kits that are designed to maximize the lifespan of the #10 can that’s housing the stuff that’s preventing you from having to eat your dog. I am always up for examining new gear..

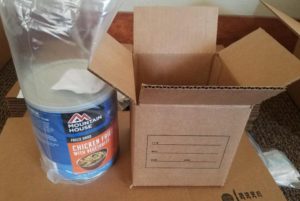
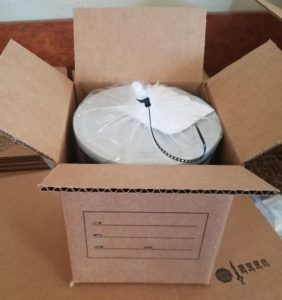
So, starting at the top:

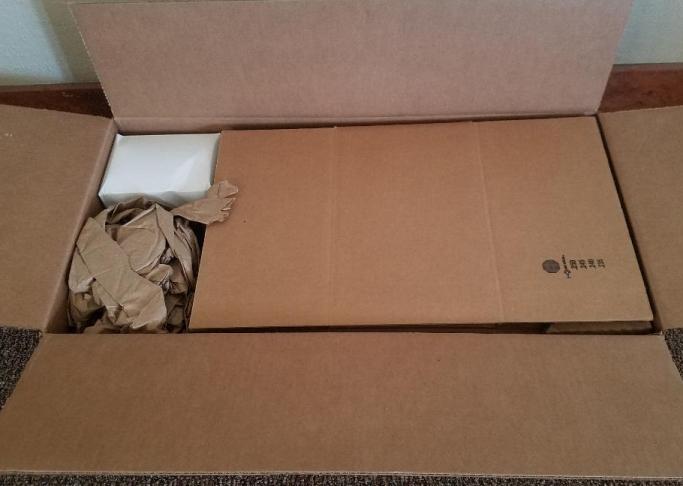
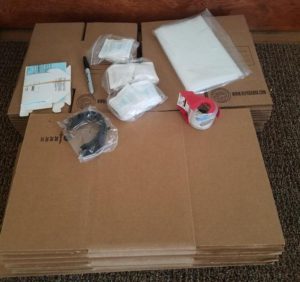
UPS dropped off a box and I was delighted at how much detail went into things. I mean, the storage boxes are marked with places to write down he contents of the box and then they provide a new black Sharpie for you to do the writing with. And a roll of tape to tape up the boxes. Literally, everything you need to pack your #10 cans for long-term storage is included…except for the shelves. Note to the guys at repackbox.com: find a bulk deal on surplus P38 can openers and include a couple with each overbox.

  • 24 boxes for individual cans
  • 6 overboxes that hold 4 individual boxes
  • 24 polybags
  • 24 dessicant packets
  • 24 zip ties
  • Sharpie
  • Roll of tape

So the idea is that you take your expensive can of yuppie chow, put it in the polybag, add a packet of desicant, ziptie the bag shut, seal it up in the small box, and then load four of them into the overbox. At that point you’re good to go for what will probably be the next hundred years.

Lather, rinse, repeat until all boxes filled. The boxes, by the by, are some heavy duty cardboard. Is it waterproof? Of course not, but thats why the cans are sealed in a polybag. Is this the sort of packaging that you could put together on your own? Maybe. I ship stuff for a living so I know all the sources for this kinds stuff. But…here it is, in one place, ready to go, and just a couple mouse clicks away.

For my current needs, this is overkill. But, overkill isn’t a bad thing. What I mean by overkill is that, for me and my current circumstance, this is more protection than seems necessary (although erring on the side of caution isn’t a vice in the world of preparedness). But…let’s say I was going to store a bunch of this stuff offsite at the Beta Site, or the family hunting cabin, or in the attic at my uncles warehouse, or under the floorboards of a family members kitchen…..well, then there’s really no such thing as overkill. Come the day when you’re fleeing the [zombies/hurricane/troops/tornado/alien overlords] and arrive at your hideout, tip over the fake woodpile, and untarp your cache, it’ll be hard to think “Man, I really didn’t need to pack that stuff as well as I did”.

The biggest issue I would think anyone would have with this sort of lily gilding is the expense. But, four cans of FD meat is $200. And then there’s the whole what-if-my-life-depends-on-it angle. Breaking the cost down, it’s about $2.91 per can to exponentially increase the level of  protection of your food supply.

Honestly, my own policy is probably that the stuff I store in my basement will probably not be packed like this. I mean, its in my basement…I can go downstairs and check on it every week if Im so inclined and stay on top of any issues. BUT…the stuff thats going to be tucked away Elsewhere…where I may not see it for a year (or years) at a time…well, that stuff is going to definitely get packed up like this.

So there you have it. There’s the old saying about how if your pants absolutely Must Not Fall Down that you go with suspenders and a belt…and then you sew your shirt to your waistband. This kit from repackbox.com is definitely the sew-your-shirt-to-your-waistband step of extra certainty. Go check ’em out.